Showing posts with label vod. Show all posts

Sunday, 2 November 2014

Preparing training materials for a specialized technical topic - IPTV on-demand services

The Challenge

I am not sure about you but reading on a specialized technical topic is always a challenge. The information available to you is always of a very dry nature.  In most technical documents that I have read, it is difficult to absorb the information from the documents because of the way the content is organized and described. Unlike fictions where the book author (s) can keep you engrossed with their way of story telling, there is no equivalent story telling in technical documentations. They do inform you about facts but due to their dry nature, most engineers find that learning by just reading the documents will incur a high learning curve.

If reading on a specialized technical topic is a challenge, preparing the training materials for such a topic is a bigger challenge. When I was tasked to present training on an area in IPTV i.e. On Demand services (e.g. VOD), I have to sit back and think of a strategy on how to do the story telling.  Non-fiction story telling to a group of highly skilled engineers is a different ball game from writing a fiction where you have the luxury of introducing interesting characters, a plot with twists and turns and besides enchanting your readers with exotic sceneries, you can add into the story line the emotional factors to stimulate the interest of your readers.

Putting myself into an engineer shoes, I scanned through the documentation and painted the documents all over with a yellow highlighter.  Looking at the highlighted keywords, I thought to myself: "Hmm, keywords may help a scholarly engineer to memorize the information but he will not be able to develop the necessary skills to apply his new found knowledge.” Realizing that my effort is not enough to conduct an effective training presentation, I asked myself some self-probing questions

  • Who are my audiences?
  • Why would the trainees attend this training?
  • Which of the facts are more important to the trainees?
  • Can the trainees apply the information learned to real life scenarios?

With these targeted goals in mind, I now looked at the information at a different angle.  This time, I re-scanned through the documentation using an "objective approach".

Metadata – 1st class citizen

“Metadata” was the first to put her hands up to get my attention. She told me that she deserved first place in the class of must know information. I agreed with her that she is definitely a first class citizen for solutions architects, presales engineers and system integration engineers. I remembered during my first encounter with OTT technologies where I was the solutions architect for a large greenfield project in Singapore, I was working furiously with my peers from Atlanta to work shop on the design. To address the client business requirements, we were exploring how to use the metadata standards (we were using CableLabs VOD Content Specification 1.1) to translate the requirements to design artifacts.

For the solutions architects, they must
  • Acquaint themselves on the differences between the standards (CableLabs VOD Content Specification 1.1, CableLabs VOD Content Specification 3.0, Microsoft TV 2.0 Metadata),
  • Identify types of information that categorized the various VOD contents,
  • Know which piece of metadata information can be changed at various phase.

For the SI engineers, they need to have a deeper knowledge on metadata so that they can
  • Perform normalization of various metadata to a common metadata format,
  • Migrate between different versions of metadata standards.

I conclude that Metadata is definitely the first class citizen in the world of VOD.


Standards galore

To provide On Demand service is a complex process. There are many standards involved. One of the objectives for the resulting training project is to make aware to solutions architects of the numerous industrial standards that are adopted in various phases of the process.

Standards for On Demand service

Metadata
 Metadata standards describe the various formats that we used to encapsulate the information of a content. From the standards, we know where we store the descriptive information of a content (e.g. the title, the artists, the ratings, and the summary of a video) and the business information (e.g. the licensing window, the contract agreement, the provider id).
I have already hinted that Metadata is a first class citizen in the VOD world. The motivation to be skillful in applying the knowledge metadata is many. One example on why metadata is important to the Solutions Architect is that he may in a situation where he needs to plan to upgrade an existing VOD system  when they are transitioning from CableLabs 1.1 to CableLabs 3.0. Another example is that he has to work out the impacts on a swap-out project when the company takes over a competitor’s solution at a client; a solution that needs to handle different metadata format from several content providers.
Encryption
Encryption standards define the various algorithms used to secure VOD content and transmission. We will learn why Data Encryption Standard (DES) is not employed in modern systems to secure our data. We will also learn about the differences between AES (Advanced Encryption standard), DES and Triple-DES. With this knowledge, the Solutions Architect will know the basis of how to select the best encoder that matches the service provider infrastructure.
Transmission
For VOD transmission, the transmission standards affect three key technologies namely
  • Satellite
  • Microwave
  • IP

“Why would I need to know about transmission standards?” asked the Solution Architect. The short answer is that he needs to know the details so he can spec out the most suitable equipment and client infrastructure with his network engineers to handle the transmission requirements. For example, without knowing the difference between the IF (Intermediate Frequency) modulator and L-Band modulator, the Solution Architect will not be able to decide on which modulator will meet the requirements of the client infrastructure. 

Compression
There are two different compression standards that are relevant to On Demand service namely video compression standard and audio compression standard. By exploring the standards and techniques, the trainee can build up a good background knowledge on MPEG (MPEG-1, MPEG-2, and MPEG-4) and various Dolby standards. He can then apply his background concepts during the transcoding stage of MPEG to other device formats (e.g. AVI, FLV or 3GP) and/or Dolby Digital to AAC.  One of my other training objectives is to ensure the Solutions Architect is made aware of the different requirements (e.g. storage capacity and performance) when he needs to design his solution to support SD (Standard Definition) and HD (High Definition) video offerings.
Distribution
For the distribution from a content distribution system to a CMS (Content Management System), CableLabs ADI 1.1 is the most widely adopted standard used. It defines not only the language but it also provides the structure and method for the distribution of the content. Knowing the limitations of the standard will equip the presales engineer and/or Solutions Architect to provide the right expectation to the client and design the appropriate solution to meet the client needs. As an example, ADI 1.1 does not allow the updating of a content once it has been ingested into the CMS. By knowing the standard, the Solution Architect can work with SI to design an efficient work around solution to “update” the content.

Content Management System (CMS)


CMS
CMS deserves a chapter on her own for the significant amount of contributions to provide a reliable On Demand service.  As this is the first of a series of technical training in the subject of IPTV, I prepared my training materials in this topic as an introductory level; a must have stepping stone towards becoming competent to IPTV. I described the key responsibilities of a CMS, the processing in each of the steps and highlighted the important concepts in CMS.

Last words

After I have designed the key topics for this project, I started to create the assessments questions cross referencing them to the objectives that I have identified. Again, I used Adobe Captivate quizzing engine to perform my data entry on my quiz. For the finishing touch, I reviewed the content, the flow structure and the assessments to ensure that I have developed the right content that covers the identified objectives.

In summary, preparing the content for a technical training is always a challenge. At least I know I have developed a good process and put in my best effort to design the content that will address the objectives of the trainees. The real reward will be when I receive feedback and stories from my trainees on how they have put into good use of their new found knowledge and skills.

Thursday, 23 October 2014

Story telling with adobe Captivate

Telling a story - IPTV Topics

I have been to many clients' presentations where the presenter executed his presales pitch with PowerPoint slides. In most cases, the presenter will reuse slides that are stock presentation materials prepared by the company's global marketing department. Although the slides would make a good presentation, this process suffered these drawbacks :- 

  1. It can only tell a common theme; one decided by the marketing team
  1. The content is not localized
  1. It does not tell the story; one that is wanted by the client

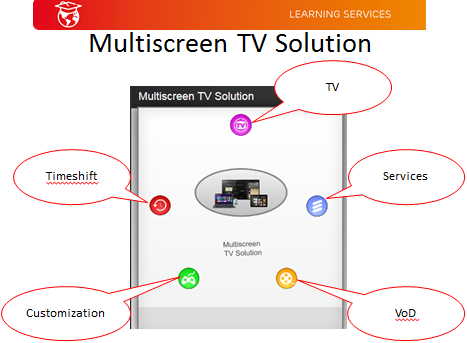
The above observation was confirmed when I was asked by a manager of a telco operator during my IPTV customization training session recently regarding the features available in the Multiscreen TV solution. The manger gave me the feedback that the Multiscreen TV solution is a very simple product.  I then realized that the presales activity did not accomplish its purpose of educating the client fully of what features are available in the product. Without knowing the capabilities of the product, the attendees of the presales pitch could not cascade to the rest of the company (especially the delivery and marketing team) the tools & features the operator can use to market their services. 

With this in mind, I started this project of telling a more compelling story to would be clients of the Multiscreen TV solution. The objective is to educate telco operators of available features of the Multiscreen TV solution.  I wanted to present a group of information to the user and allow the user to learn each feature. For this project, I grouped my information as topics.

  • TV broadcast
  • Services
  • VoD (Video On Demand)
  • Customization
  • Timeshift
  
IPTV Topics

Navigation in Captivate

The first task of my project is to allow users to navigate through my slides to explore each topic. Captivate provides navigation capability through the following interaction tools; namely Button, Click box, Learning Interactions (interactive widgets) and Drag & Drop.  
Note: The last option Drag & Drop interaction object is not available for responsive project. 
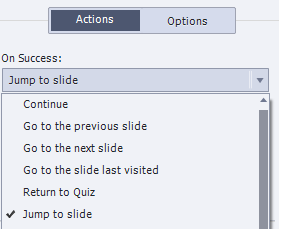
The following navigation options are available to your end user:-
  • Return to the last visited slide.
  • Goto to the previous slide
  • Goto to the next slide
  • Jump to a specific slide. 
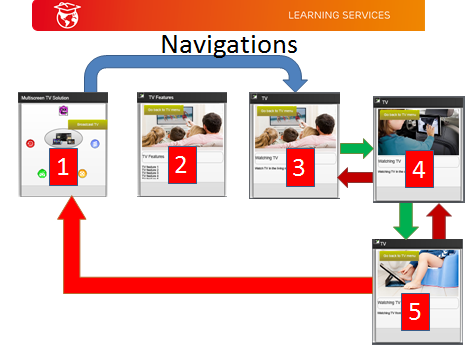
These navigation paths are illustrated below. Note that there is a subtle difference between go back to the previous slide and return to the last visited slide. The effect is illustrated in the diagram below.

Jump to slide: Slide 1 to Slide 3
Goto next slide: Slide 3 to Slide 4
Goto prev slide: Slide 4 back to Slide 3
Goto next slide: Slide 4 to Slide 5
Goto prev slide: Slide 5 back to slide 4
Return to last visited slide: Slide 5 returned to Slide 1
You can navigate your slides by using a button. In the Actions tab, you can perform any of the above option.

Navigation options
Another navigation technique that I often used is Click box. To navigate my slides,  I draw a click box over an existing background image; e.g. a map. Then I could specify any of above navigation option.
Best practice hint: Naming your slides will make it easy for you to identify the next slide you want to jump to.
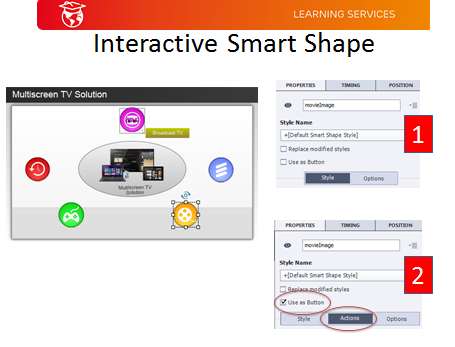
And there is more!  You can even use an existing smart object as an interactive object. Set the "Use as Button" will turn a normal smart object to an interactive smart object. There will be an additional tab added to the object properties namely the "Actions tab".

Converting a normal smart shape object to an interactive object

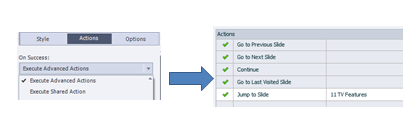
Besides the navigation options in the action tab, you can also set any of the navigation action as part of the action in the "Execute Advanced Actions" or "Execute Shared Actions".

Navigation options as part of Actions
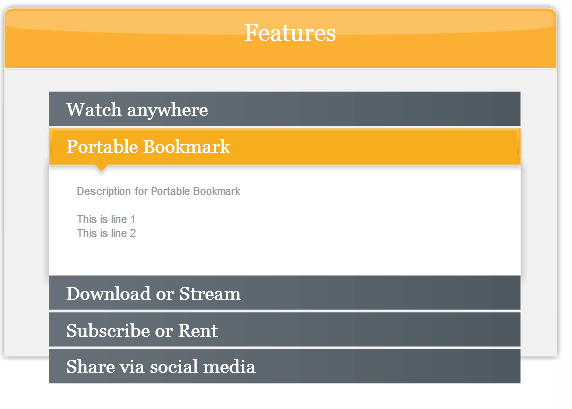
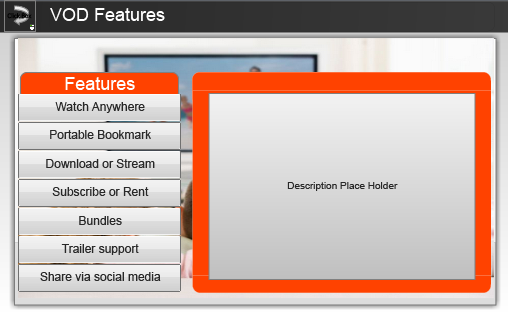
For my project, I wanted to describe each of the feature of IPTV; e.g. the VoD (Video On Demand) features. One way to illustrate the description of each feature is to implement an accordion-like slide in your presentation. In your slide, you have a set of buttons. The feature title is illustrated by a button and clicking on the button will show the description of the feature.
Option 1 - Learning Interaction
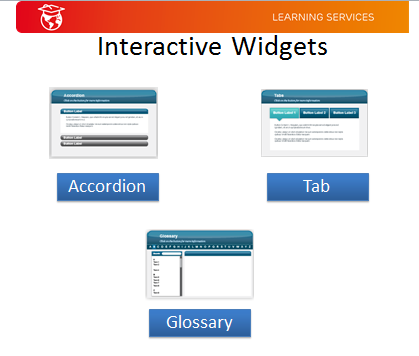
Adobe Captivate has a few stock standard objects that may be suitable for this task. These are the "Learning Interactions" widgets namely
  • Accordion
  • Tab control
  • Glossary


Learning Interactions Widgets
My first impression is "Viola!"; Without any significant effort, I can complete my slides with the Accordion widget.
Accordion Widget in action
I soon discovered a limitation on the widgets; I cannot add more than a certain number of buttons to the widgets. These limitations are shown below:-
  • Accordion - maximum 5 buttons
  • Tab - maximum 5 buttons
  • Process Circle - maximum 6 buttons
  • Circle Matrix - maximum 8 buttons
  • Glossary - no limit

Option 2 - Roll your own - simple Advanced Actions
To circumvent this limitation, I have to  resort to roll my own implementation. Adobe Captivate provides a set of programmable tools to create a more advanced interaction and customizable presentation. These tools are 
  • Advanced Actions
  • Variables
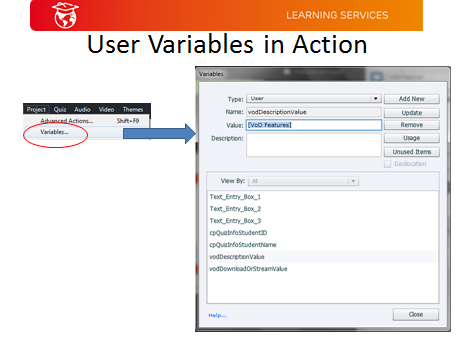
You can access  the Advanced Actions by selecting the "Execute Advanced Actions" or "Execute Shared Actions" from your Actions tab in your object properties tab. For Variables, you can create your own variables from the Project + Variables menu item.
Creating a User Variable
Best practice hint: the user variable name should describe the purpose of the variable. 
My first attempt used 8 buttons as the feature titles, 8 text captions as the feature descriptions and a group of smart shapes as the background of the feature descriptions. I chose a text caption to enter my text of the feature because it is very intuitive (WYSIWYG).

Accordion objects
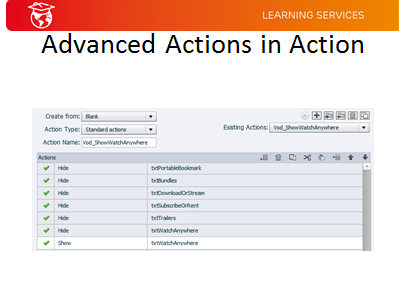
Clicking on each button will show the appropriate text caption and hide the rest of the text captions. I used the Hide and Show actions to perform this effect. 
Using Hide and Show actions
Best practice hint: Naming your objects will make it easy for you to identify the object you want to perform action on. 
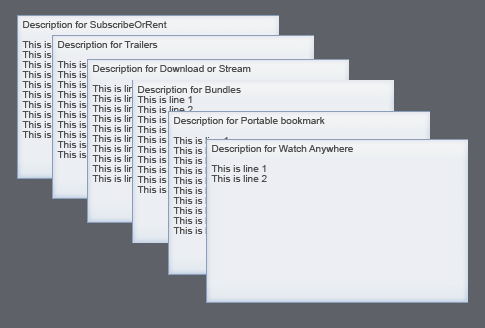
My process of entering the text of the text captions is to move these captions to the outer viewport, edit the text, then align these captions to the place holder.

Text captions - one for each feature
I found that this is not the best option as it requires a bit of moving and shuffling effort every time you want to modify my slide.
Option 2 - Roll your own - Advanced Actions and variable
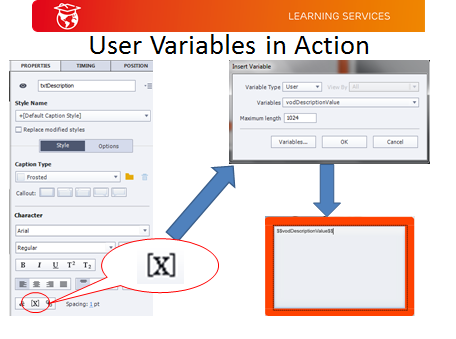
Knowing the short fall of my previous technique, my next attempt explored how user variables can be used to create a more customizable slide. For this technique, I use
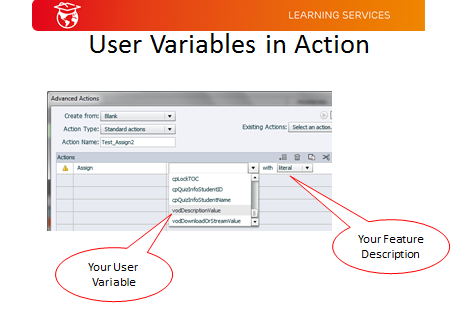
  1. a user variable named vodDescriptionValue to store the feature description.
  2. a single text caption named txtDescription to display the user variable.
  3. an Advanced Action on the button to assign the actual description text in vodDescriptionValue
Essentially, this process is a 2 step procedure. First you assign your user variable to the text caption. You then assign the text to your variable in the next step.

Step 1: Assigning a variable to a text caption

Step 2: Assign the description text to a user variable
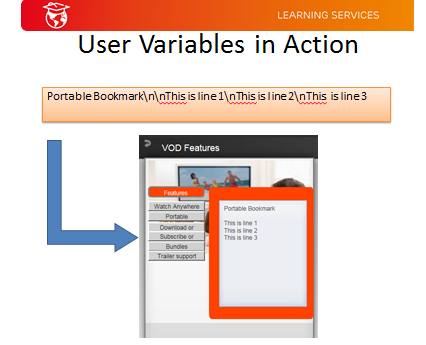
One of the improvements in Captivate v8 allows you to insert line breaks (carriage returns and/or line feeds) to your text. By using "\n" in the text setting the text in the literal field, the "\n" special character will break the lines in the text. For example, the text "Portable Bookmark\n\nThis is line 1\nThis is line 2\nThis is line 3" will be rendered as follows:-
Technique to render line breaks

In addition to the fact that entering the special encoded text is NOT WYSIWYG, I found that there is an additional flaw in Captivate. Once you have saved your text in the literal field, you lost the capability to edit the existing text. I tried to export the project to an xml and modify the source but failed. The only way to update to text is to retype your text again in the literal field. 

Limitation: For an Advanced Action, you can't edit the Literal text in Assign action.

Option 3 - Roll your own - Shared Actions
I got around the limitation of the previous technique by using Shared Actions. Creating a shared action is similar to creating an advanced action with one additional step. You will be prompted to enter details on your parameters.


Step 1: Creating a Shared Action

Best practice hint: Naming your parameters as meaningful as you can will help you remember how to use your created shared action.
After you have created the shared action, you assign values to your parameters.


Step 2: Assigning values to your shared action's parameters

This technique has the advantage over the previous by allowing you to edit your saved parameters. There is a minor inconvenience though, you will need to assign all the parameter values each time you use the shared action.

Option 4 - External file
For the bold and those who want to explore advanced techniques to create your presentation, you can use an external file as your input. You specify your data from an external file (CSV, JSON or XML) and use coding (Javascript) to link your data to user variables. This is probably the most advanced and reusable technique for your project. For this exercise, I did not explore this technique as my aim to find the easiest way to customize my presentation with little or no coding. 
Lesson recap
As a summary, I have highlighted 4 techniques that are available to authors to tell their stories.
  • Option 1 - Learning Interactive widget
  • Option 2 - Roll your own - Simple Advanced Actions
  • Option 3 - Roll your own - Shared Actions
  • Option 4 - External file
Each technique has its own pros and cons and there is no right or wrong to select a particular technique. You select the technique that is most comfortable and familiar to you.