Tuesday, 11 November 2014

A hello world application in the IPTV world

A hello world application

The other week, I was amused when I read an article analyzing on those who wrote "Hello World" applications.  The article reported that even though it is supposed to be the first and the simplest application written to demonstrate that one has gathered the necessary skills and knowledge to develop the application in the chosen programming language or framework, the work itself does show the experience and skills of the developer. What a coincidence!  This week I explore one of the first customization tasks required to create "A Hello world menu application" in the IPTV world.

When I first worked on the Commercial Client portal (code name: Avalanche), I was lucky to have the foundation of its predecessor (the MCS SDK). I have a jump start over other Solutions Architects and System Integrators who have no previous experience in the design of multi screen applications. As I began to get my hands dirty, it dawned on me that the engineers who designed this new Avalanche portal framework have done an impressive job. The portal is first class :- consistent and extremely customizable with its well designed pluggable framework. I don't get impressed too often, but this is one that really deserves my "kudo".

A bit of history first. The Avalanche portal is part of a large IPTV service provider product's Multiscreen Client Suite family which in turn is part of the company Multiscreen TV solution. It is designed as a ready to go into a client deployment with the only customization needed is put the customer's brand on it.  While this suits most customers, customers who wish to add additional application to the portal must design and develop their own application that integrates well into the portal framework.


An Objective approach

Like all exploration quests, I set myself the following objectives to prepare my training content:-
  • Develop an understand of how menus are designed and rendered in the Avalanche portal
  • Identify the design patterns used in the menu design
  • Build up the subject matter expertise in the menu framework
  • Discover and formulate the best practices for this task


Pluggable Design Pattern

As the first entry point to any customer's application, menu customization is normally the first piece of task an IPTV developer needs to tackle. Unlike the traditional menu design where one needs to add the menu in an existing menu hierarchy, creating a menu in the Avalanche portal is way way simpler.  It adopts a very flexible pluggable design pattern. 

  1. There is no explicit hierarchy to place your menu. 
  1. You do not need to add your menu explicitly.
  1. You have the flexibility to add your menu to any of the existing menu or create your own top menu; again without needing to modify existing menus.

It reminds me of the Spring3 framework's IOC design pattern. The framework will inject your menu automatically if you code your menu according the guideline. I love it when things come for free!

Menus in the Avalanche portal

For any of you who are going to design your own menu, you would have at your  disposal, the development documents (the SDK Beginner's guide, the SDK  application development guide, SDK Customization guide, Commercial Client Customization guide) and the SDK library help files.  Even with these documentations, you will find the learning curve quite daunting. Of course you can reach the end goal but it does need time and effort to be competent to develop a good IPTV application. That is where I come in; acting as the mentor for you and provide to you the right training to jump start on your development effort.

My first step to prepare the training content for this topic is to understand the background of how menus are designed and rendered in the Avalanche portal. Without this background, you may not be able create a consistent look and feel of your application within the portal. 

I powered up my tomcat and deploy the necessary war files to the webapp folder. I found that menus in the Avalanche portal are rendered on both the main menu bar and as column menus. The diagram below illustrates the default application menus.

Avalanche Portal menus


Exploring the menus further led me to have a deeper understanding of how the menus are rendered. For the menu in the main menu bar, the image is rendered via css which is identified by the class name of the menu item.


Main Menu bar

I noted that each application menu is inserted as a separate div under mainMenuItems in the HTML markup. That looks easy enough. I thought - all I need is to add the menu item into the HTML markup. Boy was I wrong in my deduction!  Upon exploring further, I discovered that I do not need to do so. The portal framework will do this automatically for you. I will elaborate on this later.

Likewise the column menu, the image is rendered via css while the text of the image is retrieved from the message file.

Column menus

The menu is implemented via the HTML markup but as I have discovered earlier, I do not need to modify any HTML markup to add my menu; the framework does this for me for free.


Know the framework

It reminds me of my experience in designing the first Apache Tiles web application. The pre-requisite to implement a good Tiles application is to know the Tiles framework.  I have diverted from the topic  so let's go back to my current quest - to prepare the training materials for this technical topic.

The pre-requisite to create a menu effectively and correctly is to understand the menu framework. This is where I identified the key concepts of the menu framework. They are

  • com.company.iptv.portal.coreapps.common.main.interfaces.MainMenuItemIF
  • Avalanche main menu
  • Menus namespace

com.company.iptv.portal.coreapps.common.main.interfaces.MainMenuItemIF
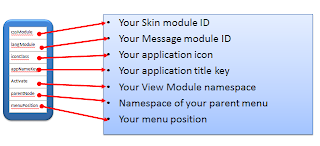
You need to inherit this interface in your module and declare the static structure of this interface. As alluded by the previous section, you do not need to make any explicit call to create your menu. All that is required is to fill in the details of the static structure and the framework will do the rest for you automatically. Nothing could be as simple as this!


MainMenuItemIF statics
cssModule, langModule
The IDs of these modules identify the skin and language modules respectively.

iconClass
The class name of the menu image icon

appNameKey
The key of application title.

activate
The namespace of the module that is activated by this menu

parentNode
The namespace that identifies the parent menu

menuPosition
The position relative to the main menu.

Avalanche main menu
The namespace of the main menu is
com.company.iptv.portal.avalanche.second.mainmenu.view.MainMenu

To add your application menu to Avalanche portal, you specify the above namespace in the parentNode (see previous section) to indicate that your application menu is a sub menu of this menu.


Menu namespace
All the menus in the Avalanche portal follow a consistent namespace naming convention i.e.
com.company.iptv.portal.avalance.second.{application}.view.MenuItem[{Module}].js


I collected all the namespaces used by the default Avalanche applications and listed them below:-

com.company.iptv.portal.avalanche.second.home.view.MenuItem
com.company.iptv.portal.avalanche.second.epg.view.MenuItem
com.company.iptv.portal.avalanche.second.vod.view.MenuItemMovies
com.company.iptv.portal.avalanche.second.vod.view.MenuItemVideos
com.company.iptv.portal.avalanche.second.mycontent.view.MenuItem
com.company.iptv.portal.avalanche.second.search.view.MenuItem
com.company.iptv.portal.avalanche.second.settings.view.MenuItem
com.company.iptv.portal.avalanche.second.settings.view.MenuItemSystem
com.company.iptv.portal.avalanche.second.settings.view.MenuItemUser


The menus in the Avalanche portal follow the same design convention. They all inherit from the com.company.iptv.portal.coreapps.common.main.interfaces.MainMenuItemIF and has the same parentNode. This is illustrated  by the diagram below.

Mappings


Menus in the Avalanche portal have the following characteristics  :-

  • Each application has its own menu in a separate source file .
    • This is the object oriented way of doing things; the separation of concerns.
    • Built for pluggable design

  • Each menu activates its own view which is created in its own file
    • This is the object oriented way of doing things; the separation of concerns.
    • Built for pluggable design

  • Each menu position is spaced generously (e.g. 10,20,30,40,50).
    • This allows the insertion of new application menu between existing menus.

  • All the menus adopt a consistent namespace.
    • Consistent design allows one to understand the system easier.
    • Built for pluggable design

  • The image icon in each menu is rendered via css.
    • Easy to change the image.

  • The messages for menu are specified in a message interface file and an actual message module file.
    • Enabled for localization.
    • Follows the service oriented pattern


Hello World menu application

With the above understanding, it is time to formulate the process of adding my menu.  To be consistent with the existing framework, I create some template modules  :-

  1. Skin module - a skin interface module, a skin module and its the corresponding css, and the image icon file
Note: No HTML markup is required for menu creation.
  1. Language module - a message interface file and its implementation
  2. MenuItem module - implements the MenuItemIF interface.
  1. The main application view module


Development Process

I summarized the key steps to create the Hello World menu application :-
  1. Create your MenuItem.js with the right namespace
  1. Declare MainMenuItemIF.js as your implementation.
  1. Fill in the statics details of MainMenuItemIF
How to map

  1. Link your image in your css
    1. Render in the main menu bar - .app-icon- paint-target.{iconClass}


    1. Render in the Home Column  - .{iconClass}{space}.app-icon- paint-target

  1. Create your messagesIF.js to add the application title key
  1. Create your messages.js to set the application title text in the application text key
  1. Fill in the template view.js with the module id as the value in 3c and enter the following text


Are you ready?

I believe I have prepared the necessary concepts and training materials for my training session. 

The next step is to prepare a practical exercise for the trainees to apply  their new found knowledge and to build up their competency in IPTV development. With both the theoretical and practical training sessions, I am sure that my trainees are ready to be assessed with my quiz.  Are you ready?


Sunday, 2 November 2014

Preparing training materials for a specialized technical topic - IPTV on-demand services

The Challenge

I am not sure about you but reading on a specialized technical topic is always a challenge. The information available to you is always of a very dry nature.  In most technical documents that I have read, it is difficult to absorb the information from the documents because of the way the content is organized and described. Unlike fictions where the book author (s) can keep you engrossed with their way of story telling, there is no equivalent story telling in technical documentations. They do inform you about facts but due to their dry nature, most engineers find that learning by just reading the documents will incur a high learning curve.

If reading on a specialized technical topic is a challenge, preparing the training materials for such a topic is a bigger challenge. When I was tasked to present training on an area in IPTV i.e. On Demand services (e.g. VOD), I have to sit back and think of a strategy on how to do the story telling.  Non-fiction story telling to a group of highly skilled engineers is a different ball game from writing a fiction where you have the luxury of introducing interesting characters, a plot with twists and turns and besides enchanting your readers with exotic sceneries, you can add into the story line the emotional factors to stimulate the interest of your readers.

Putting myself into an engineer shoes, I scanned through the documentation and painted the documents all over with a yellow highlighter.  Looking at the highlighted keywords, I thought to myself: "Hmm, keywords may help a scholarly engineer to memorize the information but he will not be able to develop the necessary skills to apply his new found knowledge.” Realizing that my effort is not enough to conduct an effective training presentation, I asked myself some self-probing questions

  • Who are my audiences?
  • Why would the trainees attend this training?
  • Which of the facts are more important to the trainees?
  • Can the trainees apply the information learned to real life scenarios?

With these targeted goals in mind, I now looked at the information at a different angle.  This time, I re-scanned through the documentation using an "objective approach".

Metadata – 1st class citizen

Metadata” was the first to put her hands up to get my attention. She told me that she deserved first place in the class of must know information. I agreed with her that she is definitely a first class citizen for solutions architects, presales engineers and system integration engineers. I remembered during my first encounter with OTT technologies where I was the solutions architect for a large greenfield project in Singapore, I was working furiously with my peers from Atlanta to work shop on the design. To address the client business requirements, we were exploring how to use the metadata standards (we were using CableLabs VOD Content Specification 1.1) to translate the requirements to design artifacts.

For the solutions architects, they must
  • Acquaint themselves on the differences between the standards (CableLabs VOD Content Specification 1.1, CableLabs VOD Content Specification 3.0, Microsoft TV 2.0 Metadata),
  • Identify types of information that categorized the various VOD contents,
  • Know which piece of metadata information can be changed at various phase.

For the SI engineers, they need to have a deeper knowledge on metadata so that they can
  • Perform normalization of various metadata to a common metadata format,
  • Migrate between different versions of metadata standards.

I conclude that Metadata is definitely the first class citizen in the world of VOD.


Standards galore

To provide On Demand service is a complex process. There are many standards involved. One of the objectives for the resulting training project is to make aware to solutions architects of the numerous industrial standards that are adopted in various phases of the process.

Standards for On Demand service

Metadata
 Metadata standards describe the various formats that we used to encapsulate the information of a content. From the standards, we know where we store the descriptive information of a content (e.g. the title, the artists, the ratings, and the summary of a video) and the business information (e.g. the licensing window, the contract agreement, the provider id).
I have already hinted that Metadata is a first class citizen in the VOD world. The motivation to be skillful in applying the knowledge metadata is many. One example on why metadata is important to the Solutions Architect is that he may in a situation where he needs to plan to upgrade an existing VOD system  when they are transitioning from CableLabs 1.1 to CableLabs 3.0. Another example is that he has to work out the impacts on a swap-out project when the company takes over a competitor’s solution at a client; a solution that needs to handle different metadata format from several content providers.
Encryption
Encryption standards define the various algorithms used to secure VOD content and transmission. We will learn why Data Encryption Standard (DES) is not employed in modern systems to secure our data. We will also learn about the differences between AES (Advanced Encryption standard), DES and Triple-DES. With this knowledge, the Solutions Architect will know the basis of how to select the best encoder that matches the service provider infrastructure.
Transmission
For VOD transmission, the transmission standards affect three key technologies namely
  • Satellite
  • Microwave
  • IP

“Why would I need to know about transmission standards?” asked the Solution Architect. The short answer is that he needs to know the details so he can spec out the most suitable equipment and client infrastructure with his network engineers to handle the transmission requirements. For example, without knowing the difference between the IF (Intermediate Frequency) modulator and L-Band modulator, the Solution Architect will not be able to decide on which modulator will meet the requirements of the client infrastructure. 

Compression
There are two different compression standards that are relevant to On Demand service namely video compression standard and audio compression standard. By exploring the standards and techniques, the trainee can build up a good background knowledge on MPEG (MPEG-1, MPEG-2, and MPEG-4) and various Dolby standards. He can then apply his background concepts during the transcoding stage of MPEG to other device formats (e.g. AVI, FLV or 3GP) and/or Dolby Digital to AAC.  One of my other training objectives is to ensure the Solutions Architect is made aware of the different requirements (e.g. storage capacity and performance) when he needs to design his solution to support SD (Standard Definition) and HD (High Definition) video offerings.
Distribution
For the distribution from a content distribution system to a CMS (Content Management System), CableLabs ADI 1.1 is the most widely adopted standard used. It defines not only the language but it also provides the structure and method for the distribution of the content. Knowing the limitations of the standard will equip the presales engineer and/or Solutions Architect to provide the right expectation to the client and design the appropriate solution to meet the client needs. As an example, ADI 1.1 does not allow the updating of a content once it has been ingested into the CMS. By knowing the standard, the Solution Architect can work with SI to design an efficient work around solution to “update” the content.

Content Management System (CMS)


CMS
CMS deserves a chapter on her own for the significant amount of contributions to provide a reliable On Demand service.  As this is the first of a series of technical training in the subject of IPTV, I prepared my training materials in this topic as an introductory level; a must have stepping stone towards becoming competent to IPTV. I described the key responsibilities of a CMS, the processing in each of the steps and highlighted the important concepts in CMS.

Last words

After I have designed the key topics for this project, I started to create the assessments questions cross referencing them to the objectives that I have identified. Again, I used Adobe Captivate quizzing engine to perform my data entry on my quiz. For the finishing touch, I reviewed the content, the flow structure and the assessments to ensure that I have developed the right content that covers the identified objectives.

In summary, preparing the content for a technical training is always a challenge. At least I know I have developed a good process and put in my best effort to design the content that will address the objectives of the trainees. The real reward will be when I receive feedback and stories from my trainees on how they have put into good use of their new found knowledge and skills.

Friday, 31 October 2014

Is there a difference in training females?

Is there a difference in training females?


To tell the truth, I have never pondered on this question until I read an article on “Best Practices on Training Adults”. Is there a difference? I murmured to myself. I began to have “flash-back” of my previous encounters with female trainees in my training sessions.

Women Participation in a classroom

Among a group of male dominated trainees at a recent training session on System Operations, I recalled that Joanna was the most inquisitive trainee. Through her, we explored and discussed quite a number of “what if” scenarios; all of which is good as her participation heightened the interest of the whole group making the session a more casual and active learning environment. The behavior of Joanna is the “norm”; in fact, now that I think about it, I observed that my female trainees asked more questions than their male counterpart.

The article on “Best Practice on Training Adults” surmised that most women believe that they do not know enough so through training, they can acquire more skills. The “to acquire more skills” reason brought back a recent conversation when I asked the test manager why she wanted to be included in another technical training. Her answer: “I wanted to know about the technology that my team is testing on”.

Men on the other part, do not believe training is the first avenue to acquire skills; most of them learn their skills through the “doing part” e.g. by active exploration and experimentation of the system or software. The overused quote of “Men will only read the manual at the last resort” seemed to justify this observation.

Don’t men ask questions? They do occasionally but mostly in a situation that would highlight their expertise or knowledge in the subject matter; they often ask the “Advanced” question.  That reminds me of Selva. I remembered that Selva was the one who asked me the most difficult question on diameter during a technical training session. How many of you remembered that in any of your company presentations there was always one that would ask the most curly question? Was the person a he or she? From my personal experience, nine times out of ten, the answer was a male. Point made.

What does this mean to you? Having female participants to your training session is a blessing because you know that your trainees came to your session because they are motivated to learn. And if you have female trainees actively participating in asking the questions that no one dares to ask, it is the best feedback to you that you have done a good job in conducting your training session.

Women Participation in a lab session

Hands up to those who have partnered with a group of fellow students to do experiments in your school laboratory and you noticed that male participants were often the most active experimenters. Well, nothing has changed in the after school life; men are still the more active DO-ers.

Using Joanna’s example again, I recalled that during the group exercise, Josh Anthony became the dominant partner instead.  There is a psychological fact on why female trainees are quieter than male trainees in this situation: females are reluctant because of one or more of the following reasons  [1]:-
  • Shyness.
  • Fear of failure
  • Fear of upsetting the social hierarchy

It is important to recognize that there is a difference of behavior in males and females. To conduct a more effective learning environment, you must increase the activeness in female participation. Some of the best practices I have adopted are :-
  • Avoid placing a single female alone in any practical exercise.
  • Do not impose any assessment during any practical exercise. The knowledge that one will not be penalized removes the fear factor of female trainees and will encourage their participation.
  • Maintain a positive and supportive environment. Knowing that they will be supported will reduce their reluctance (in participation).

Women Participation after a training session

The job of a trainer does not stop after the training session. The learning activity does not stop after the training session; it is only the beginning. Thus it brings me joy if I have email enquiries from trainees days or weeks after the official training.  My job as a trainer is to maintain a good supportive role to answer and clarify queries to help the goals for the trainee i.e. to gain competency in the knowledge and skills in the areas of the training session.  I do find that female trainees sent more questions than their male counterpart.

Other golden rules when working with female trainees

As in working in an office environment, there are some general golden rules that I have adopted when working with female trainees
  • Maintain a clear professional protocol between male and female.
  • Avoid using any political in-correct words and phrases when addressing the female.
  • Avoid blond jokes or any derogatory statements on female gender.
  • Pay extra respect when addressing female trainees of a higher seniority. E.g. in some countries, I will address the more senior female trainees by calling them Madam or Mam (m-a-m) that is aligned with the local custom of paying the right respect to them.
Last words

Besides the technical factor (to prepare the right mixture of content), I now appreciate that there is also another equation to be a successful trainer: the human factor.

[1] - Source : Wikipedia

Sunday, 26 October 2014

Quizzing - as simple as 1-2-3-4

Quizzing

This week, I started to explore the Captivate's Quiz capabilities. Quizzing is the final piece of puzzle of my current project : "Telling stories on IPTV topics " using adobe Captivate. It (quizzing) allows me to assess how much my students have grasped the knowledge of my presentation. The easiest entry point to providing quizzing features is via the "Quiz > Questions Slide " menu. Selecting this option will prompt you to enter the details of
  1. The type of questions you would like to have in your quiz. 
  2. For each type, the total questions. 
  3. For each type, if they will contribute to your assessment (i.e. if they are graded).
While you can design your questions on the fly, the procedure of creating your quiz encourages you to prepare your questions before you do your data entry on Captivate's quiz engine.


Step 1 

Let's start the design process. First, you need to understand the different question types that are available to you. Each question type address how you want to assess your students. 

Multiple choice
Allow users to select one or more correct answers
True/False
Allow users to choose either True or False
Fill-in-the-blank
Allow users to type in the answer  by filling in the blank
Show answer
Allow users to type in the answer
Matching
Allow users to match the right answer from two list
Hot spot
Allow users to select the right area (hot spot) on the slide
Sequence
Allows users to reorder a list to the right sequence

Once you have decided on the characteristics of your quiz (namely the types of questions and the total questions), you enter the details in your quiz engine. As an illustration, the diagram below will generate 10x Multiple Choice questions, 3x True/False questions, 2x Fill-in-the-blank questions, 3x Matching questions, and 2x Sequence questions.


Question Types
Referring to the example above, Captivate quiz engine will generate a total of 20 additional slides into your project.

Step 2 

The next step is input your quiz details on your quiz slides. For each slide, you execute the common steps
  1. Enter your question 
  2. Enter the details of each answer choice. 
  3. Select the right answer 


Step 3

Depending on your question type, you may need to customize your quiz further.

More Answer choices
For the following type of questions (Multiple Choice and Matching), most likely you need to enter more answer choices. The default behavior of the quiz engine generates only two answer choices for Multiple Choice (cf 3 answer choices for Matching). You add more choices by entering the number of answers in the Quiz properties tab.

To remove the number of answers, you enter a lower number of answers.
 More than one Answers
For the following type of questions (Multiple Choice), you can change the question behavior to allow more than one answers as the correct answer. By default, the question slide generated is a single answer question. You can change this behavior to by selecting the "Multiple Answers" checkbox.
Introduce randomness
For the following type of questions (Multiple Choice, Matching), you can introduce randomness to your answer choices. By selecting the "Shuffle Answers" checkbox for Multiple Choice type of question (or "Shuffle Column 1" for Matching), the quiz engine will display the answer choices in a random order each time the quiz is being taken.
There is an easier procedure to do this. Rather than manually selecting the above checkbox on each of your slides, you can select the "Shuffle Answers" checkbox in the Quiz Preference to have this behavior to all your question slides.
 The above examples are illustrated below.

Customization on Matching type of questions

Customization on Multiple Answers type of questions
Step 4

The final step is set the scores for your quiz. By default, each question is allocated 10 points (see diagram below).

Assigning points for correct answer
For question with more than one correct answer , you need to allocate the points for each correct answer in the question.  The following procedure shows you how to perform the points allocation

  1. Enable "Partial Score" for the question
  1. Select the correct answer
  1. In the properties tab, select the Options tab.
  1. Enter the value you allocate for the selected answer.

Oops… did I say final step? The final final step before you complete your quiz is to decide whether you want to assess your user one question at a time or allow the user to submit all the questions in one shot. You set this behavior in the Quiz > Quiz Preferences by enable the "Submit All questions" checkbox.

Viola, you now have the means to create your quiz. 

Limitations

I explored further on the capabilities and found the following limitations on Captivate v8 :-

  1. You can't export your quiz to an XML. The work around is to create your slides into a Question Pool or create your questions in GIFT  format (General Import Format Technology).

  1. You can't categorize your questions. I thought of two ways to categorize your questions into specific topics. The first way is to assign a suitable prefix to the Interaction IDs of your questions.  You can probably write an external tool to identify the category via the prefix. The second method is to create a Question Pool per category. Either way is not ideal but I am going for the Question Pool per category method as it is much easier to insert questions of a particular topic by selecting the right Question Pool. Do share with me if you have found an alternative method.

  1. You can't select the total number of random questions from the Question Pool. You must create one random question each time you want to insert question slides from the Question Pool.

  1. You can't have Partial Score answers on questions created from the Question Pool.


Thursday, 23 October 2014

Story telling with adobe Captivate

Telling a story - IPTV Topics

I have been to many clients' presentations where the presenter executed his presales pitch with PowerPoint slides. In most cases, the presenter will reuse slides that are stock presentation materials prepared by the company's global marketing department. Although the slides would make a good presentation, this process suffered these drawbacks :- 

  1. It can only tell a common theme; one decided by the marketing team
  1. The content is not localized
  1. It does not tell the story; one that is wanted by the client

The above observation was confirmed when I was asked by a manager of a telco operator during my IPTV customization training session recently regarding the features available in the Multiscreen TV solution. The manger gave me the feedback that the Multiscreen TV solution is a very simple product.  I then realized that the presales activity did not accomplish its purpose of educating the client fully of what features are available in the product. Without knowing the capabilities of the product, the attendees of the presales pitch could not cascade to the rest of the company (especially the delivery and marketing team) the tools & features the operator can use to market their services. 

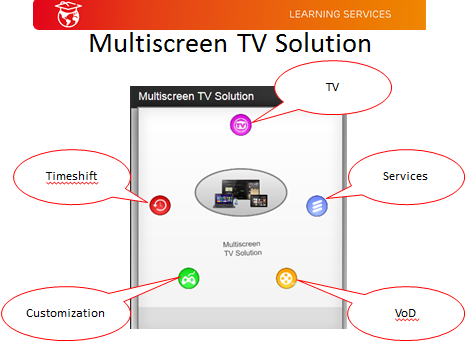
With this in mind, I started this project of telling a more compelling story to would be clients of the Multiscreen TV solution. The objective is to educate telco operators of available features of the Multiscreen TV solution.  I wanted to present a group of information to the user and allow the user to learn each feature. For this project, I grouped my information as topics.

  • TV broadcast
  • Services
  • VoD (Video On Demand)
  • Customization
  • Timeshift
  
IPTV Topics

Navigation in Captivate

The first task of my project is to allow users to navigate through my slides to explore each topic. Captivate provides navigation capability through the following interaction tools; namely Button, Click box, Learning Interactions (interactive widgets) and Drag & Drop.  
Note: The last option Drag & Drop interaction object is not available for responsive project. 
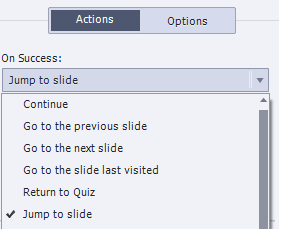
The following navigation options are available to your end user:-
  • Return to the last visited slide.
  • Goto to the previous slide
  • Goto to the next slide
  • Jump to a specific slide. 
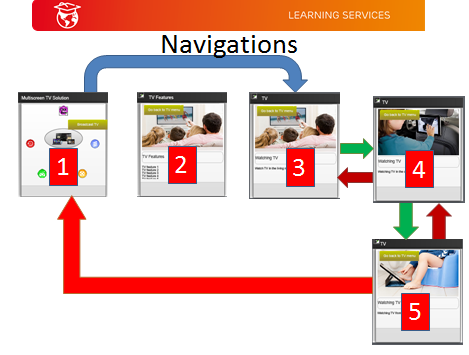
These navigation paths are illustrated below. Note that there is a subtle difference between go back to the previous slide and return to the last visited slide. The effect is illustrated in the diagram below.

Jump to slide: Slide 1 to Slide 3
Goto next slide: Slide 3 to Slide 4
Goto prev slide: Slide 4 back to Slide 3
Goto next slide: Slide 4 to Slide 5
Goto prev slide: Slide 5 back to slide 4
Return to last visited slide: Slide 5 returned to Slide 1
You can navigate your slides by using a button. In the Actions tab, you can perform any of the above option.

Navigation options
Another navigation technique that I often used is Click box. To navigate my slides,  I draw a click box over an existing background image; e.g. a map. Then I could specify any of above navigation option.
Best practice hint: Naming your slides will make it easy for you to identify the next slide you want to jump to.
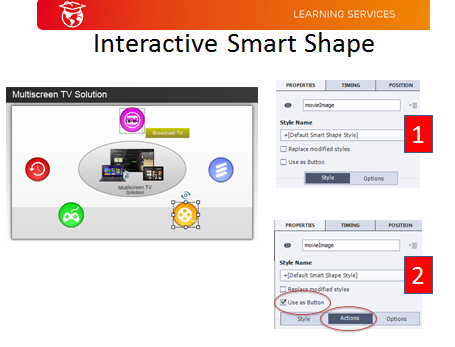
And there is more!  You can even use an existing smart object as an interactive object. Set the "Use as Button" will turn a normal smart object to an interactive smart object. There will be an additional tab added to the object properties namely the "Actions tab".

Converting a normal smart shape object to an interactive object

Besides the navigation options in the action tab, you can also set any of the navigation action as part of the action in the "Execute Advanced Actions" or "Execute Shared Actions".

Navigation options as part of Actions
For my project, I wanted to describe each of the feature of IPTV; e.g. the VoD (Video On Demand) features. One way to illustrate the description of each feature is to implement an accordion-like slide in your presentation. In your slide, you have a set of buttons. The feature title is illustrated by a button and clicking on the button will show the description of the feature.
Option 1 - Learning Interaction
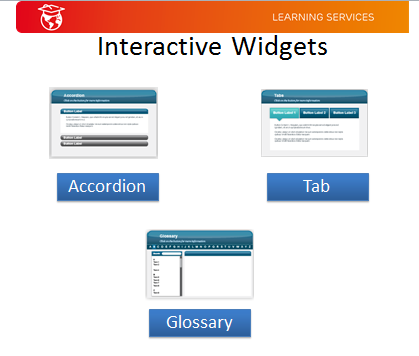
Adobe Captivate has a few stock standard objects that may be suitable for this task. These are the "Learning Interactions" widgets namely
  • Accordion
  • Tab control
  • Glossary


Learning Interactions Widgets
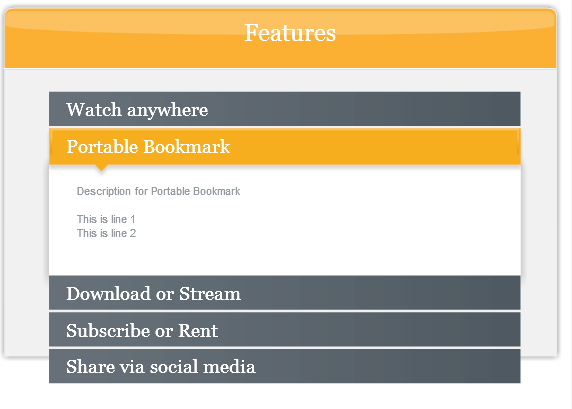
My first impression is "Viola!"; Without any significant effort, I can complete my slides with the Accordion widget.
Accordion Widget in action
I soon discovered a limitation on the widgets; I cannot add more than a certain number of buttons to the widgets. These limitations are shown below:-
  • Accordion - maximum 5 buttons
  • Tab - maximum 5 buttons
  • Process Circle - maximum 6 buttons
  • Circle Matrix - maximum 8 buttons
  • Glossary - no limit

Option 2 - Roll your own - simple Advanced Actions
To circumvent this limitation, I have to  resort to roll my own implementation. Adobe Captivate provides a set of programmable tools to create a more advanced interaction and customizable presentation. These tools are 
  • Advanced Actions
  • Variables
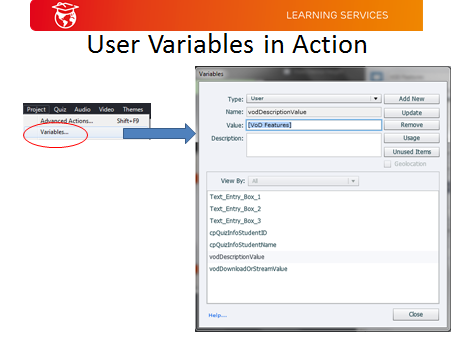
You can access  the Advanced Actions by selecting the "Execute Advanced Actions" or "Execute Shared Actions" from your Actions tab in your object properties tab. For Variables, you can create your own variables from the Project + Variables menu item.
Creating a User Variable
Best practice hint: the user variable name should describe the purpose of the variable. 
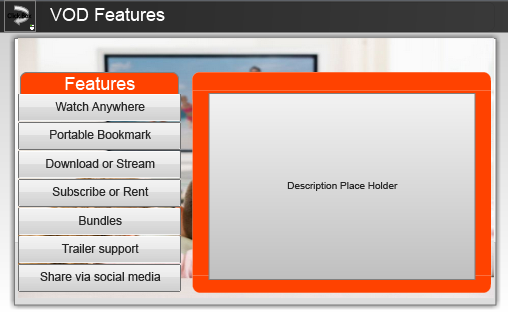
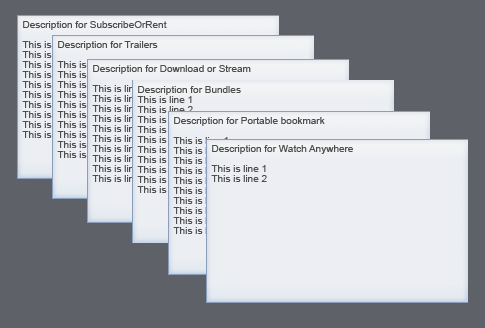
My first attempt used 8 buttons as the feature titles, 8 text captions as the feature descriptions and a group of smart shapes as the background of the feature descriptions. I chose a text caption to enter my text of the feature because it is very intuitive (WYSIWYG).

Accordion objects
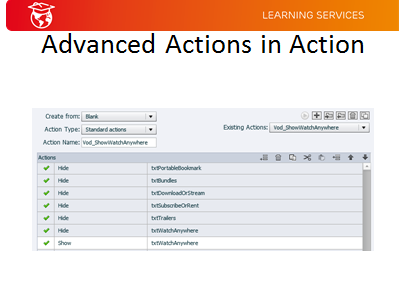
Clicking on each button will show the appropriate text caption and hide the rest of the text captions. I used the Hide and Show actions to perform this effect. 
Using Hide and Show actions
Best practice hint: Naming your objects will make it easy for you to identify the object you want to perform action on. 
My process of entering the text of the text captions is to move these captions to the outer viewport, edit the text, then align these captions to the place holder.

Text captions - one for each feature
I found that this is not the best option as it requires a bit of moving and shuffling effort every time you want to modify my slide.
Option 2 - Roll your own - Advanced Actions and variable
Knowing the short fall of my previous technique, my next attempt explored how user variables can be used to create a more customizable slide. For this technique, I use
  1. a user variable named vodDescriptionValue to store the feature description.
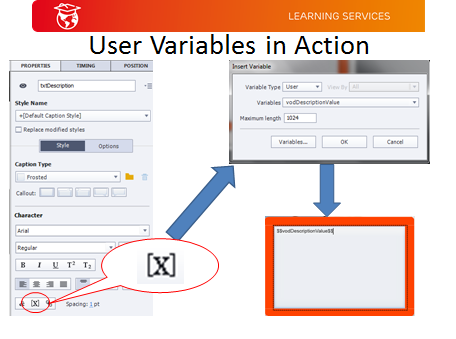
  2. a single text caption named txtDescription to display the user variable.
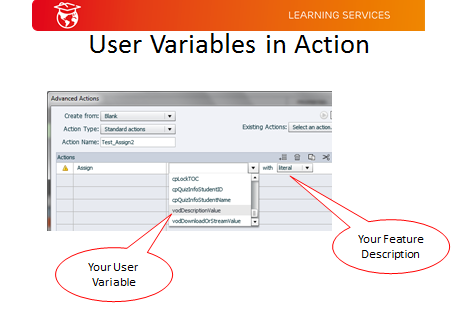
  3. an Advanced Action on the button to assign the actual description text in vodDescriptionValue
Essentially, this process is a 2 step procedure. First you assign your user variable to the text caption. You then assign the text to your variable in the next step.

Step 1: Assigning a variable to a text caption

Step 2: Assign the description text to a user variable
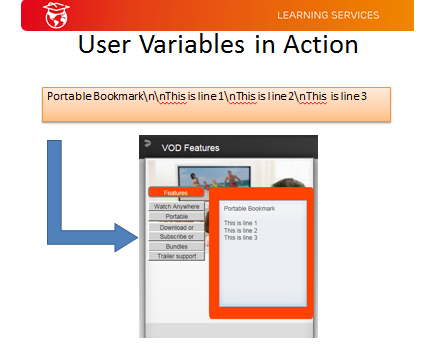
One of the improvements in Captivate v8 allows you to insert line breaks (carriage returns and/or line feeds) to your text. By using "\n" in the text setting the text in the literal field, the "\n" special character will break the lines in the text. For example, the text "Portable Bookmark\n\nThis is line 1\nThis is line 2\nThis is line 3" will be rendered as follows:-
Technique to render line breaks

In addition to the fact that entering the special encoded text is NOT WYSIWYG, I found that there is an additional flaw in Captivate. Once you have saved your text in the literal field, you lost the capability to edit the existing text. I tried to export the project to an xml and modify the source but failed. The only way to update to text is to retype your text again in the literal field. 

Limitation: For an Advanced Action, you can't edit the Literal text in Assign action.

Option 3 - Roll your own - Shared Actions
I got around the limitation of the previous technique by using Shared Actions. Creating a shared action is similar to creating an advanced action with one additional step. You will be prompted to enter details on your parameters.


Step 1: Creating a Shared Action

Best practice hint: Naming your parameters as meaningful as you can will help you remember how to use your created shared action.
After you have created the shared action, you assign values to your parameters.


Step 2: Assigning values to your shared action's parameters

This technique has the advantage over the previous by allowing you to edit your saved parameters. There is a minor inconvenience though, you will need to assign all the parameter values each time you use the shared action.

Option 4 - External file
For the bold and those who want to explore advanced techniques to create your presentation, you can use an external file as your input. You specify your data from an external file (CSV, JSON or XML) and use coding (Javascript) to link your data to user variables. This is probably the most advanced and reusable technique for your project. For this exercise, I did not explore this technique as my aim to find the easiest way to customize my presentation with little or no coding. 
Lesson recap
As a summary, I have highlighted 4 techniques that are available to authors to tell their stories.
  • Option 1 - Learning Interactive widget
  • Option 2 - Roll your own - Simple Advanced Actions
  • Option 3 - Roll your own - Shared Actions
  • Option 4 - External file
Each technique has its own pros and cons and there is no right or wrong to select a particular technique. You select the technique that is most comfortable and familiar to you.