Friday, 31 October 2014

Is there a difference in training females?

Is there a difference in training females?


To tell the truth, I have never pondered on this question until I read an article on “Best Practices on Training Adults”. Is there a difference? I murmured to myself. I began to have “flash-back” of my previous encounters with female trainees in my training sessions.

Women Participation in a classroom

Among a group of male dominated trainees at a recent training session on System Operations, I recalled that Joanna was the most inquisitive trainee. Through her, we explored and discussed quite a number of “what if” scenarios; all of which is good as her participation heightened the interest of the whole group making the session a more casual and active learning environment. The behavior of Joanna is the “norm”; in fact, now that I think about it, I observed that my female trainees asked more questions than their male counterpart.

The article on “Best Practice on Training Adults” surmised that most women believe that they do not know enough so through training, they can acquire more skills. The “to acquire more skills” reason brought back a recent conversation when I asked the test manager why she wanted to be included in another technical training. Her answer: “I wanted to know about the technology that my team is testing on”.

Men on the other part, do not believe training is the first avenue to acquire skills; most of them learn their skills through the “doing part” e.g. by active exploration and experimentation of the system or software. The overused quote of “Men will only read the manual at the last resort” seemed to justify this observation.

Don’t men ask questions? They do occasionally but mostly in a situation that would highlight their expertise or knowledge in the subject matter; they often ask the “Advanced” question.  That reminds me of Selva. I remembered that Selva was the one who asked me the most difficult question on diameter during a technical training session. How many of you remembered that in any of your company presentations there was always one that would ask the most curly question? Was the person a he or she? From my personal experience, nine times out of ten, the answer was a male. Point made.

What does this mean to you? Having female participants to your training session is a blessing because you know that your trainees came to your session because they are motivated to learn. And if you have female trainees actively participating in asking the questions that no one dares to ask, it is the best feedback to you that you have done a good job in conducting your training session.

Women Participation in a lab session

Hands up to those who have partnered with a group of fellow students to do experiments in your school laboratory and you noticed that male participants were often the most active experimenters. Well, nothing has changed in the after school life; men are still the more active DO-ers.

Using Joanna’s example again, I recalled that during the group exercise, Josh Anthony became the dominant partner instead.  There is a psychological fact on why female trainees are quieter than male trainees in this situation: females are reluctant because of one or more of the following reasons  [1]:-
  • Shyness.
  • Fear of failure
  • Fear of upsetting the social hierarchy

It is important to recognize that there is a difference of behavior in males and females. To conduct a more effective learning environment, you must increase the activeness in female participation. Some of the best practices I have adopted are :-
  • Avoid placing a single female alone in any practical exercise.
  • Do not impose any assessment during any practical exercise. The knowledge that one will not be penalized removes the fear factor of female trainees and will encourage their participation.
  • Maintain a positive and supportive environment. Knowing that they will be supported will reduce their reluctance (in participation).

Women Participation after a training session

The job of a trainer does not stop after the training session. The learning activity does not stop after the training session; it is only the beginning. Thus it brings me joy if I have email enquiries from trainees days or weeks after the official training.  My job as a trainer is to maintain a good supportive role to answer and clarify queries to help the goals for the trainee i.e. to gain competency in the knowledge and skills in the areas of the training session.  I do find that female trainees sent more questions than their male counterpart.

Other golden rules when working with female trainees

As in working in an office environment, there are some general golden rules that I have adopted when working with female trainees
  • Maintain a clear professional protocol between male and female.
  • Avoid using any political in-correct words and phrases when addressing the female.
  • Avoid blond jokes or any derogatory statements on female gender.
  • Pay extra respect when addressing female trainees of a higher seniority. E.g. in some countries, I will address the more senior female trainees by calling them Madam or Mam (m-a-m) that is aligned with the local custom of paying the right respect to them.
Last words

Besides the technical factor (to prepare the right mixture of content), I now appreciate that there is also another equation to be a successful trainer: the human factor.

[1] - Source : Wikipedia

Sunday, 26 October 2014

Quizzing - as simple as 1-2-3-4

Quizzing

This week, I started to explore the Captivate's Quiz capabilities. Quizzing is the final piece of puzzle of my current project : "Telling stories on IPTV topics " using adobe Captivate. It (quizzing) allows me to assess how much my students have grasped the knowledge of my presentation. The easiest entry point to providing quizzing features is via the "Quiz > Questions Slide " menu. Selecting this option will prompt you to enter the details of
  1. The type of questions you would like to have in your quiz. 
  2. For each type, the total questions. 
  3. For each type, if they will contribute to your assessment (i.e. if they are graded).
While you can design your questions on the fly, the procedure of creating your quiz encourages you to prepare your questions before you do your data entry on Captivate's quiz engine.


Step 1 

Let's start the design process. First, you need to understand the different question types that are available to you. Each question type address how you want to assess your students. 

Multiple choice
Allow users to select one or more correct answers
True/False
Allow users to choose either True or False
Fill-in-the-blank
Allow users to type in the answer  by filling in the blank
Show answer
Allow users to type in the answer
Matching
Allow users to match the right answer from two list
Hot spot
Allow users to select the right area (hot spot) on the slide
Sequence
Allows users to reorder a list to the right sequence

Once you have decided on the characteristics of your quiz (namely the types of questions and the total questions), you enter the details in your quiz engine. As an illustration, the diagram below will generate 10x Multiple Choice questions, 3x True/False questions, 2x Fill-in-the-blank questions, 3x Matching questions, and 2x Sequence questions.


Question Types
Referring to the example above, Captivate quiz engine will generate a total of 20 additional slides into your project.

Step 2 

The next step is input your quiz details on your quiz slides. For each slide, you execute the common steps
  1. Enter your question 
  2. Enter the details of each answer choice. 
  3. Select the right answer 


Step 3

Depending on your question type, you may need to customize your quiz further.

More Answer choices
For the following type of questions (Multiple Choice and Matching), most likely you need to enter more answer choices. The default behavior of the quiz engine generates only two answer choices for Multiple Choice (cf 3 answer choices for Matching). You add more choices by entering the number of answers in the Quiz properties tab.

To remove the number of answers, you enter a lower number of answers.
 More than one Answers
For the following type of questions (Multiple Choice), you can change the question behavior to allow more than one answers as the correct answer. By default, the question slide generated is a single answer question. You can change this behavior to by selecting the "Multiple Answers" checkbox.
Introduce randomness
For the following type of questions (Multiple Choice, Matching), you can introduce randomness to your answer choices. By selecting the "Shuffle Answers" checkbox for Multiple Choice type of question (or "Shuffle Column 1" for Matching), the quiz engine will display the answer choices in a random order each time the quiz is being taken.
There is an easier procedure to do this. Rather than manually selecting the above checkbox on each of your slides, you can select the "Shuffle Answers" checkbox in the Quiz Preference to have this behavior to all your question slides.
 The above examples are illustrated below.

Customization on Matching type of questions

Customization on Multiple Answers type of questions
Step 4

The final step is set the scores for your quiz. By default, each question is allocated 10 points (see diagram below).

Assigning points for correct answer
For question with more than one correct answer , you need to allocate the points for each correct answer in the question.  The following procedure shows you how to perform the points allocation

  1. Enable "Partial Score" for the question
  1. Select the correct answer
  1. In the properties tab, select the Options tab.
  1. Enter the value you allocate for the selected answer.

Oops… did I say final step? The final final step before you complete your quiz is to decide whether you want to assess your user one question at a time or allow the user to submit all the questions in one shot. You set this behavior in the Quiz > Quiz Preferences by enable the "Submit All questions" checkbox.

Viola, you now have the means to create your quiz. 

Limitations

I explored further on the capabilities and found the following limitations on Captivate v8 :-

  1. You can't export your quiz to an XML. The work around is to create your slides into a Question Pool or create your questions in GIFT  format (General Import Format Technology).

  1. You can't categorize your questions. I thought of two ways to categorize your questions into specific topics. The first way is to assign a suitable prefix to the Interaction IDs of your questions.  You can probably write an external tool to identify the category via the prefix. The second method is to create a Question Pool per category. Either way is not ideal but I am going for the Question Pool per category method as it is much easier to insert questions of a particular topic by selecting the right Question Pool. Do share with me if you have found an alternative method.

  1. You can't select the total number of random questions from the Question Pool. You must create one random question each time you want to insert question slides from the Question Pool.

  1. You can't have Partial Score answers on questions created from the Question Pool.


Thursday, 23 October 2014

Story telling with adobe Captivate

Telling a story - IPTV Topics

I have been to many clients' presentations where the presenter executed his presales pitch with PowerPoint slides. In most cases, the presenter will reuse slides that are stock presentation materials prepared by the company's global marketing department. Although the slides would make a good presentation, this process suffered these drawbacks :- 

  1. It can only tell a common theme; one decided by the marketing team
  1. The content is not localized
  1. It does not tell the story; one that is wanted by the client

The above observation was confirmed when I was asked by a manager of a telco operator during my IPTV customization training session recently regarding the features available in the Multiscreen TV solution. The manger gave me the feedback that the Multiscreen TV solution is a very simple product.  I then realized that the presales activity did not accomplish its purpose of educating the client fully of what features are available in the product. Without knowing the capabilities of the product, the attendees of the presales pitch could not cascade to the rest of the company (especially the delivery and marketing team) the tools & features the operator can use to market their services. 

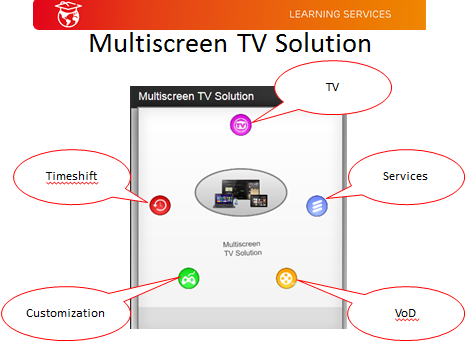
With this in mind, I started this project of telling a more compelling story to would be clients of the Multiscreen TV solution. The objective is to educate telco operators of available features of the Multiscreen TV solution.  I wanted to present a group of information to the user and allow the user to learn each feature. For this project, I grouped my information as topics.

  • TV broadcast
  • Services
  • VoD (Video On Demand)
  • Customization
  • Timeshift
  
IPTV Topics

Navigation in Captivate

The first task of my project is to allow users to navigate through my slides to explore each topic. Captivate provides navigation capability through the following interaction tools; namely Button, Click box, Learning Interactions (interactive widgets) and Drag & Drop.  
Note: The last option Drag & Drop interaction object is not available for responsive project. 
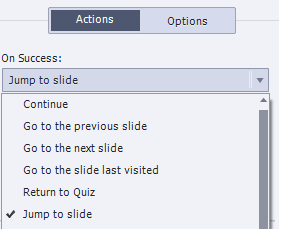
The following navigation options are available to your end user:-
  • Return to the last visited slide.
  • Goto to the previous slide
  • Goto to the next slide
  • Jump to a specific slide. 
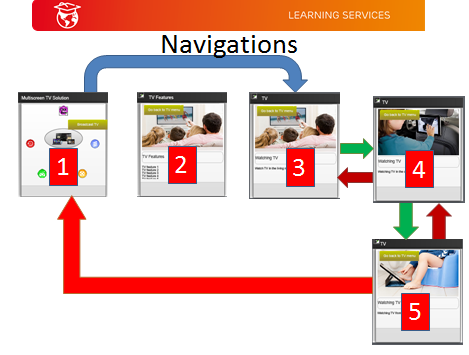
These navigation paths are illustrated below. Note that there is a subtle difference between go back to the previous slide and return to the last visited slide. The effect is illustrated in the diagram below.

Jump to slide: Slide 1 to Slide 3
Goto next slide: Slide 3 to Slide 4
Goto prev slide: Slide 4 back to Slide 3
Goto next slide: Slide 4 to Slide 5
Goto prev slide: Slide 5 back to slide 4
Return to last visited slide: Slide 5 returned to Slide 1
You can navigate your slides by using a button. In the Actions tab, you can perform any of the above option.

Navigation options
Another navigation technique that I often used is Click box. To navigate my slides,  I draw a click box over an existing background image; e.g. a map. Then I could specify any of above navigation option.
Best practice hint: Naming your slides will make it easy for you to identify the next slide you want to jump to.
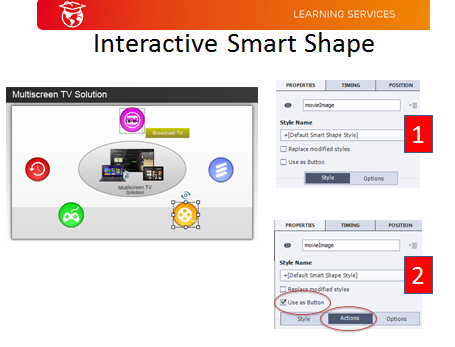
And there is more!  You can even use an existing smart object as an interactive object. Set the "Use as Button" will turn a normal smart object to an interactive smart object. There will be an additional tab added to the object properties namely the "Actions tab".

Converting a normal smart shape object to an interactive object

Besides the navigation options in the action tab, you can also set any of the navigation action as part of the action in the "Execute Advanced Actions" or "Execute Shared Actions".

Navigation options as part of Actions
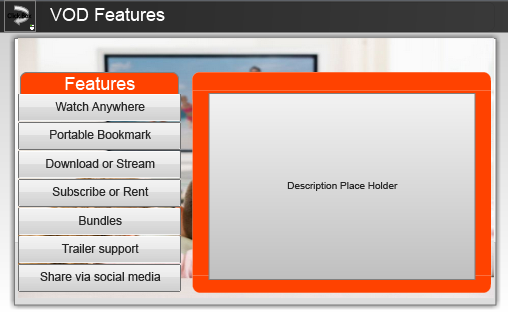
For my project, I wanted to describe each of the feature of IPTV; e.g. the VoD (Video On Demand) features. One way to illustrate the description of each feature is to implement an accordion-like slide in your presentation. In your slide, you have a set of buttons. The feature title is illustrated by a button and clicking on the button will show the description of the feature.
Option 1 - Learning Interaction
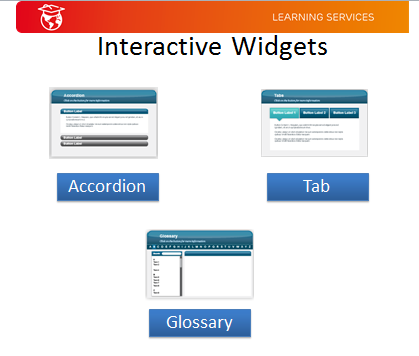
Adobe Captivate has a few stock standard objects that may be suitable for this task. These are the "Learning Interactions" widgets namely
  • Accordion
  • Tab control
  • Glossary


Learning Interactions Widgets
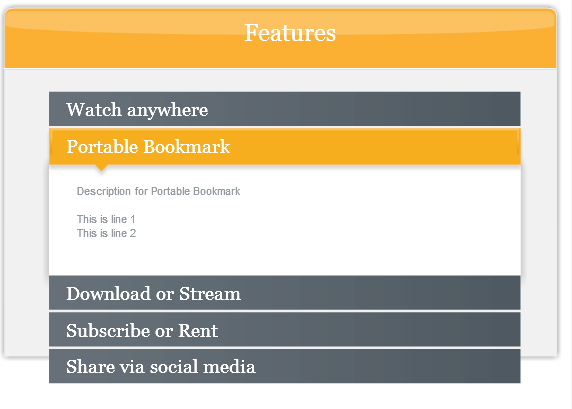
My first impression is "Viola!"; Without any significant effort, I can complete my slides with the Accordion widget.
Accordion Widget in action
I soon discovered a limitation on the widgets; I cannot add more than a certain number of buttons to the widgets. These limitations are shown below:-
  • Accordion - maximum 5 buttons
  • Tab - maximum 5 buttons
  • Process Circle - maximum 6 buttons
  • Circle Matrix - maximum 8 buttons
  • Glossary - no limit

Option 2 - Roll your own - simple Advanced Actions
To circumvent this limitation, I have to  resort to roll my own implementation. Adobe Captivate provides a set of programmable tools to create a more advanced interaction and customizable presentation. These tools are 
  • Advanced Actions
  • Variables
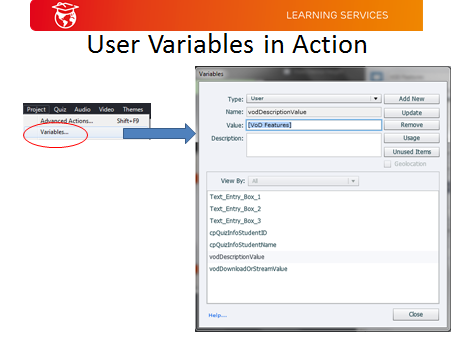
You can access  the Advanced Actions by selecting the "Execute Advanced Actions" or "Execute Shared Actions" from your Actions tab in your object properties tab. For Variables, you can create your own variables from the Project + Variables menu item.
Creating a User Variable
Best practice hint: the user variable name should describe the purpose of the variable. 
My first attempt used 8 buttons as the feature titles, 8 text captions as the feature descriptions and a group of smart shapes as the background of the feature descriptions. I chose a text caption to enter my text of the feature because it is very intuitive (WYSIWYG).

Accordion objects
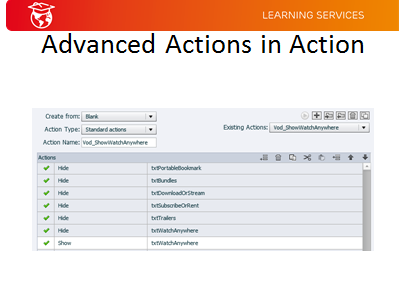
Clicking on each button will show the appropriate text caption and hide the rest of the text captions. I used the Hide and Show actions to perform this effect. 
Using Hide and Show actions
Best practice hint: Naming your objects will make it easy for you to identify the object you want to perform action on. 
My process of entering the text of the text captions is to move these captions to the outer viewport, edit the text, then align these captions to the place holder.

Text captions - one for each feature
I found that this is not the best option as it requires a bit of moving and shuffling effort every time you want to modify my slide.
Option 2 - Roll your own - Advanced Actions and variable
Knowing the short fall of my previous technique, my next attempt explored how user variables can be used to create a more customizable slide. For this technique, I use
  1. a user variable named vodDescriptionValue to store the feature description.
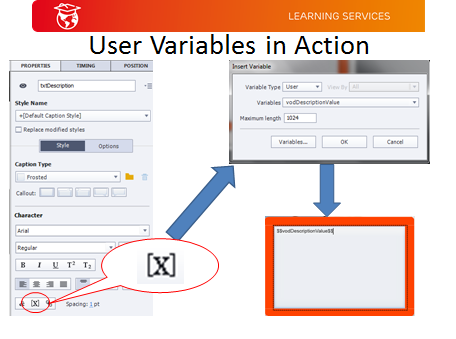
  2. a single text caption named txtDescription to display the user variable.
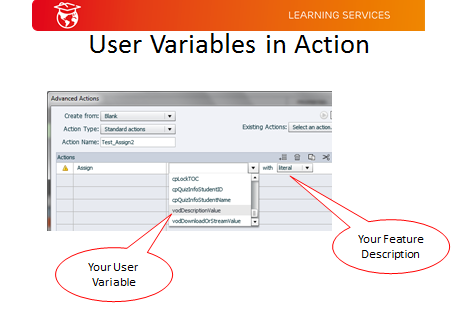
  3. an Advanced Action on the button to assign the actual description text in vodDescriptionValue
Essentially, this process is a 2 step procedure. First you assign your user variable to the text caption. You then assign the text to your variable in the next step.

Step 1: Assigning a variable to a text caption

Step 2: Assign the description text to a user variable
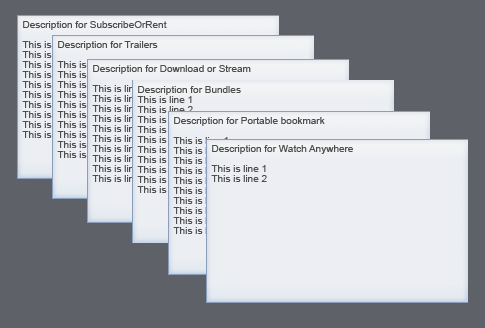
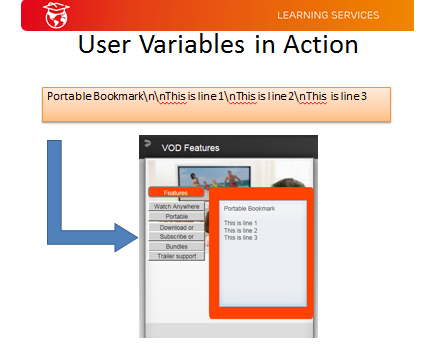
One of the improvements in Captivate v8 allows you to insert line breaks (carriage returns and/or line feeds) to your text. By using "\n" in the text setting the text in the literal field, the "\n" special character will break the lines in the text. For example, the text "Portable Bookmark\n\nThis is line 1\nThis is line 2\nThis is line 3" will be rendered as follows:-
Technique to render line breaks

In addition to the fact that entering the special encoded text is NOT WYSIWYG, I found that there is an additional flaw in Captivate. Once you have saved your text in the literal field, you lost the capability to edit the existing text. I tried to export the project to an xml and modify the source but failed. The only way to update to text is to retype your text again in the literal field. 

Limitation: For an Advanced Action, you can't edit the Literal text in Assign action.

Option 3 - Roll your own - Shared Actions
I got around the limitation of the previous technique by using Shared Actions. Creating a shared action is similar to creating an advanced action with one additional step. You will be prompted to enter details on your parameters.


Step 1: Creating a Shared Action

Best practice hint: Naming your parameters as meaningful as you can will help you remember how to use your created shared action.
After you have created the shared action, you assign values to your parameters.


Step 2: Assigning values to your shared action's parameters

This technique has the advantage over the previous by allowing you to edit your saved parameters. There is a minor inconvenience though, you will need to assign all the parameter values each time you use the shared action.

Option 4 - External file
For the bold and those who want to explore advanced techniques to create your presentation, you can use an external file as your input. You specify your data from an external file (CSV, JSON or XML) and use coding (Javascript) to link your data to user variables. This is probably the most advanced and reusable technique for your project. For this exercise, I did not explore this technique as my aim to find the easiest way to customize my presentation with little or no coding. 
Lesson recap
As a summary, I have highlighted 4 techniques that are available to authors to tell their stories.
  • Option 1 - Learning Interactive widget
  • Option 2 - Roll your own - Simple Advanced Actions
  • Option 3 - Roll your own - Shared Actions
  • Option 4 - External file
Each technique has its own pros and cons and there is no right or wrong to select a particular technique. You select the technique that is most comfortable and familiar to you. 

Wednesday, 15 October 2014

adobe Captivate - a new trainer tool

To Adobe - Good on yer
The de facto tool of choice for trainers is PowerPoint. While I was exploring new ways to present my training, I discovered Adobe has a product for trainers. The product was formerly a flagship product from Macromedia, the creator of the ubiquitous web designing tools; Flash and Dreamweaver. After Adobe acquired Macromedia in 2005, Adobe has continued to improve Captivate to make the tool even more friendly and added more features for trainers to prepare their materials. I was glad that history did not repeat itself that products after being taken over often died a slow death when the new owner did not know what to do with the product. I wondered how many remembered when IBM took over the then de facto word processor; WordPerfect. Similarly when UnderWare sold one of the most popular programmer's text editors "Brief" to Borland, Brief died a similar death. It therefore gave me a tickle of happiness that a product (in this case Captivate) can continue to grow and live its purpose. For that, "good on yer, Adobe", for doing a wonderful job to continue to grow and add useful features to Captivate.

Multiscreen
One of Captivate's features that attracted my attention is her ability to create multiscreen training materials in a WYSIWYG way without any coding. In this modern era, where users are no longer restricted to sitting behind the desk and using their PCs, users are demanding to have access to contents from their smartphones, from their tablets and of course from their laptops; access to the same content anywhere and anytime. Multiscreen enabled the content author (e.g. trainer) to create a single content and present the same content to users via their devices of choices (laptops, smartphones, tablets and in other cases, TVs). Captivate provides a very simple way to create multi-screen contents. Markers on the captivate editor (also known as breakpoints) set the 3 standard views; each view serves the layout for the dimensions for the targeted device
  1. Primary view for laptops (1024 x 627)
  2. Tablet view for tablets (768 x 627)
  3. Mobile view for smartphones (360 x 415)


Adobe believes that these 3 standard layouts are sufficient to get target most of your audience out there. You can change these layout sizes (heights or width) but you are restricted in the total layouts available to you; you cannot add more breakpoints. 
Adobe coined the term "responsive" design to describe how Captivate allows content authors to design a single training content that will be rendered correctly to their users. My way of interpreting this jargon is that contents will be auto responsive to the devices the users used to view the contents; i.e the contents will be rendered correctly on the appropriate device. Adobe further makes it easier for the authors to pretest how their content will look on laptops, tablets and smartphones via the multi-device preview feature. You can also use the free Adobe Edge app to preview your content on a physical mobile device. Responsive design is only available in Captivate version 8. 

Parent-Child-Grandchild inheritance
The Adobe engineers adopted an inheritance design pattern to make the content author easy to create content for 3 different views. The design pattern adopts a parent-child-grandchild concept. The primary view is the parent. Whenever you change the objects in the primary view, the content in the child view and grandchild view will be automatically modified. Similarly whenever you change the objects in the tablet view (the child), the grandchild view will be automatically modified. However, when you do this operation on the child, the parent-child relationship will be broken; i.e. the objects in the parent view will not be changed. The ability to break the parent-child-grandchild relationship is a very useful feature to authors.
There is another technique to have a different look and feel between the views. You can either use the "Exclude from Other views" or you can pull the object to the outside the viewpoint from any view. Internally, using the first option will pull the object to the outside the viewpoint from the other views. There is however, a subtle difference in the output. To have an object in a specific view (either in the Parent, the Child or the Grandchild), use the first option on the specific view (see purple rectangle below). To have an object in both the Parent, Child view, use the second option on the Grandchild view (see white rectangle below). To have an object in the Child and Grandchild view (see green rectangle), it is a two step process. First, you must Exclude the object from other views on the Parent view followed by pulling the object back from the outside in the Child view. 

Blue rectangle is rendered in all views
Purple rectangle is shown only in the Parent view.
White rectangle is rendered in both Parent and Child views
Note: the Green rectangle is outside the viewpoint of the Parent view
Blue rectangle is rendered in all views
White rectangle is rendered in both Parent and Child views
Green rectangle is rendered in Child and Grandchild views

Smart positioning - How smart can you be?
One of the features that Captivate provides to authors to design your object layouts is smart positioning. Smart positioning allows you to anchor your object relative to the slide boundary. This feature reminds me of a similar functionality by Microsoft XAML editor in Microsoft C#. Compared to Microsoft C# editor, Captivate provides more options to position your objects. 
By default, any object created is anchored to the top and left boundary of your slide. Positioning is made even easier by visually dragging the smart-positioning anchor to the other boundary. Please note that the a position marker can only be re-positioned in the same direction. The top boundary marker can only be re-positioned vertically to the bottom while the right boundary marker can only be re-positioned horizontally to the left boundary marker. 
Bug Alert: There is a bug in v8.0.0.145 when you duplicate your object. The "Object Size" may be different in your grandchild view or the text changed in your primary view is not changed in your grandchild view.
For positioning, I recommend you to set your position value using the % instead of using the pixel. The layout renders correctly in the different views when you select to use the % unit. If you opt for the latter option (pixel), you must set the positions separately in all the views. Besides the % and px, you can also use the "% Relative" if you have the need to position an object relative to another object. 
Last but not least, you have at your disposal, the min-max feature of Captivate. This allows to fix your object size so that the auto-scaling feature will not distort the shape of your objects. This is illustrated by the diagram below. The objects (white rectangle and the adobe logo) on the bottom is fixed to a minimum size while the top objects (purple rectangle and the adobe logo) scaled accordingly when they are rendered on the grandchild view.


"Layout of multiple objects" made easy
Modifying the layout of multiple objects is made very simple with Captivate. Once you have selected two or more objects, you can
  • align your selected objects to the top, left, bottom or right,
  • size them equally
  • space them horizontally or vertically
The first selected object is used as the reference for your modification. Example, if you align two or more objects to the left by selecting object_1, object_2 and object_3, all the objects will be aligned left to your first selected object (object_1).

What's Next
As my main aim is to create assessment questions during my training session, I would discuss my exploration on the Quiz capability of Captivate. This feature in combination of the navigation capability of the slides will be explored in my next segment.

Tuesday, 14 October 2014

Diameter - just when you thought you were working with a standard

Just when you thought you were working with a standard
When I was working with a large swap out charging system recently, we have to integrate to an existing 3rd party vendor's (Nokia Siemens Network) product. The protocol used by the 3rd party is diameter (RFC 6733). "That would be easy peasy piece of job" as some would think that since we were swapping out the existing 3rd party product, all that is required is to change existing clients to point to the replaced Ericsson charging nodes since both products (the Ericsson's product and 3PP product) publish to the same protocol standard. The myth is crashed because although like all standards, there are also slight variations to the standard as each vendor designed their interface differently to take advantage of their system features. 
Recognizing the differences between the two standards is one of my key task as I have to educate our partner vendor to perform the necessary mapping transformation from NSN's protocol to Ericsson's protocol (SCAPv2). NSN uses Service-Information (AVP code 873) to package her user-defined charging information while Ericsson achieves the same through the Service-Parameter-Info (AVP code 607). Internet provides my initial source of information but I have to resort on cramming on the two products documentation to come out with the right mapping. 
Seagull - an essential SI tool
The other challenge that the team faced is how to perform functional tests on the NSN diameter protocol. Although there is an Ericsson simulation tool, I was getting no joy from internal Ericsson's experts who have advised me that the effort required to get the tool up and running may be significant. The initial path adopted by the team is to capture the protocol on several use cases and played back the captured protocol to simulate the use cases.I soon realized the short falls of this technique as it was a slow discovery process to uncover new bugs. The game is on to look for a new functional testing tool. After the evaluations of several candidates, I settled on using an open source multi-protocol traffic generator, Seagull. 


There are no internal experts to consult and the brief Seagull documentation details is of not much help neither. I have to resort to reverse engineer the protocol from other sources. I used another open-source tool; this time wireshark (formerly known as ethereal). Creating the NSN diameter dictionary file was the first step. 


The next stage would be to design the scenario files. A scenario file describes the messages that were exchanged during traffic. In Seagull, you create one scenario file per use case. The scenario file contains two key sections; the <init> section and the <traffic> section. In the <init> section, you specify the CER command sent and the expected command received (normally CEA) during the initialization stage. In the <traffic> section, you specify your CCR command that you would be sending and the expected CCA command to receive. The actual CCR and CCA differs in each use case and the protocol is specific to how the backend charging system supports the charging function.
Creating a generic tool makes the learning more effective. The tool that I have developed is a testing suite to test the functions of the business requirements of the actual project. To make the tool flexible to test all possible test factors (e.g. the user phone number, the product id, the plan code, the amount to be charged, the session id), I extended Seagull by creating parameterized variables to replace the parameters during run time.
ECUR and IEC
The testing suite supports both types of charging :-
  • ECUR  (Session based charging)
  • IEC (Event based charging)
It allows testing engineers to perform the following functional tests

ECUR Functional Tests
  • Reserve payment
  • Commit (after a reserved is made)
  • Cancel of a reservation
  • Get transaction status
IEC Functional Tests
  • Direct debit
  • Get subscriber’s wallet details
  • Activate a subscriber via MMS

Questions for assessment purpose


Building this testing suite allowed me to gain in-depth knowledge of Seagull to create an effective training session to Ericsson's testing team. Designing the materials there after becomes an easy task. The final stage of designing the training session is to create questions for assessment purpose. To make the learning more valuable to the engineers, I have further customized some of the questions specifically for the client environment. Relating the questions to the client environment thus become a "relatable experience" to the students and make the learning more effective. Here is a sample of the questions that I have designed for this training:-
  1. Which protocol does SEAGULL use to test the IL charging gateway?
  2. Which one of the following is not a valid DIAMETER message?
  3. Which tool do you use to perform your snoop?
  4. What does CCN use to decide on a unique peer?
  5. Which DIAMETER message is missing in your snoop if you do not see any deduction?
  6. What is a session based charging?
  7. What is a default timeout for a session based charging?
  8. In which state of the subscriber can you perform a deduction?
  9. If the subscriber is in a PRE-ACTIVE state, which type of DIAMETER operation will be successful?
  10. What is EPOCH?
  11. Which field associates a “Reserved Payment” operation and a “Get Transaction status” operation?
  12. What is the easiest way to verify if a payment has been reserved?
  13. Which of the following is a ECUR operation?
  14. If you perform a deduction using plan code BD5, how much will be deducted from the AIR TIME balance?
  15. What is the Result-Code when you try to perform a “Direct Debit” on a PRE-ACTIVE subscriber?
  16. What is the Result-Code when you try to perform a “Direct Debit” on subscriber who has insufficient balance?
  17. What is the Result-Code when you try to perform a “Commit Payment” if you have not performed a reserved payment?
  18. What is the Result-Code when you perform a “Get Balance” query on a subscriber with insufficient balance?
  19. Which of the following is an IEC operation?

Saturday, 11 October 2014

The Art of Training

The Art of Training
Some of the tools I often used to communicate my lessons are
  • PowerPoint slides - lecturing
  • Whiteboard - reinforcing the ideas / concepts
  • Group Exercises - social learning
  • Demonstrations - visual learning
  • Summary - recap on the topics
  • Pre and Post Tests - feedback to the students
  • Reverse shadow - enforce the student's understanding of its topic
Why would I need to use more than one tool to delivery my training? The short answer is that together the tools will help to build up the knowledge of the students on the selected topic(s) more effectively. For the long answer, please continue on (reading) ... 
Since my University days, I learned that attending a lecture is often not sufficient to fully learn a subject. Attending lectures is a rather passive form of learning. A lecture is good only as a factual type of learning a topic.   
To supplement the learning process, I often employed other techniques such as performing a demonstration to the students. Through the demonstration, the students may be able to relate the information personally. It also helps to raise the student interest and reinforce his memory retention. Learning through demonstration thus become a form of "connected learning". 
Other techniques that I have adopted to train students more effectively is through group exercises. Group exercises help some learners (e.g. social learners) to grasp a topic more easily. As students are actively engaged in pursuing the exercise, learning becomes more fun and effective. It also eliminates the "personal failure" fear factor as the participating student is no longer an individual under the lime light. In addition, it encourages the students to think less bias on the topic. 
To make learning a more "relatable experience", I often designed my materials based on a common theme. I chose the theme that most of my students can relate to personally. It could be a theme that everyone has a common interest in (e.g. Soccer or problems that they faced each day). By having a common interest, learning becomes more relatable.  
Finally, no training will go well without having an assessment test to the students. Doing an assessment gives to the students (the necessary feedback of how well the students have understood the subject and to myself, how effective I have designed and communicated my training materials. I used a very simple approach: a pretest before the training to gauge the students' pre-knowledge on the topic and a post-test to measure the students' gained in knowledge. 
A side note: have you ever wondered among yourselves about two trainers presenting the same factual content and you noted that one trainer was more effective in his training than the other? There could be many factors that lead to the different outcome, but some of the reasons could be due to
  • the trainer's soft-skills
  • the delivery of the trainer's content
  • the way the trainer engages the audience.
  • the trainer's subject matter expertise on the topic.
No textbook can teach you all of these and I am in the same boat. However, I believe that through practice, experience and dedication, I am getting there (at least from the favorable feedback from my students).  
Be prepared
I often write on the whiteboard (using "whiteboard markers") to emphasize important concepts and ideas. The last point of using whiteboard markers is a pun because I have seen so many presenters defaced the whiteboard by using permanent ink markers. That really gets my goolies as I expect that testing the marker would be the first step of any presenter before he writes on the whiteboard. The other goolies that gets me is that the previous presenter often left behind empty or near empty whiteboard markers that are unusable. Having been caught by these scenarios numerous of times, I now bring along my own whiteboard markers to any training session. 
The rest of my checklists before a training session are 
  • Loan a working projector for your PowerPoint presentation from the administrator / facility
  • Connectivity to internet or intranet 
  • The required software or web application link for your students
  • The names of your students
  • The local contact person who organizes your room and lunch/drinks/tea breaks for your students
  • Possible questions and problem scenarios that your students may ask
  • Your technical SME